We all have aches and pains of some description. If you've ever wished you knew a few little tricks to help you feel back to fabulous look no further.
Reflexology works on the face, hands, feet and even the ears, and is an incredible way to stimulate the nervous system enabling all of your organs to perform at their optimum best.
Each area of your hand/foot/face/ear is connected to a part of your body and by applying pressure and massaging these specific pressure points you ultimately encourage these organs to function more efficiently.
Sounds incredible right? This crafty little healing therapy stems back from China, India and ancient Egypt dating back to 2300 BC, so has certainly been helping the world to heal throughout the ages.
Today's entry invites you try out 5 simple steps to helping relive the discomfort of carpel tunnel syndrome, whilst encouraging your body to heal it'self and eliminate toxins.
The motion you want to create when using reflexology is referred to as thumb walking:
Apply firm pressure to an area, shuffle forward, if you notice any grit or bubble like consistencies under the skin please do circular motions on the area and then shuffle forward, apply pressure again and shuffle forward. Do this until all the recommend points have been stimulated.
Step 1: The Cervical Vertebrae.
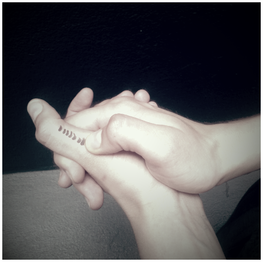
There are 7 discs to the cervical vertebrae. This reflex is located along the side ridge of the bone of your thumb and should be stimulated/massaged using 7 firm steps along the area.
Start at the same point that is demonstrated in the diagram, apply pressure using the pad of your thumb and shuffle forward until you have stimulated all 7 points and reached the area just before your joint.
Go over this area several times. If any of the points are painful then please go over them as much as possible and do large circular movements. The pain simply shows that that the reflex point is out of balance so will require more attention. You will notice the pain diminish the more you go over it. Do this on both the right and left hand.
Step 2: The Thoracic Vertebrae
Leading on from the cervical vertebrae reflex, the thoracic vertebrae reflex continues in 12 points along the ridge of the hand, continuing on from the thumb working towards the wrist. You will need to thumb walk and apply pressure in 12 steps until you reach the curvature of the hand before the wrist. Again, if any areas feel painful, crunchy or bubbly, that's your cue to increase attention to the area (if you can tolerate it) and make large circular motions. Do this on both the right and left hand.
Step 3: The shoulder reflex.
You'll find this reflex in between the outer two metacarpal bones (your hand bones). Apply pressure from approximately a centimetre below the knuckle and shuffle down for 4 steps. You'll notice this area can be quite tender and as before apply pressure and large circular motions on any spots which are painful, gritty or bubbly. Do this on both the right and left hand.
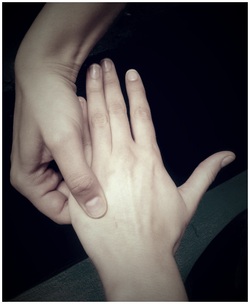
Step 4: The Adrenal Glad Relfex

This little gem is your pain relief guru. The adrenal gland releases cortisone and will help your body to manage and regulate it's pain relief. This point is at the top of the spongiest part of your hand (a smidge lower than it appears in the diagram). You'll know when you've hit the spot as you'll experience quite a sharp and deep sensation once it's been stimulated. Press deeply on this area and use circular motions. You can use this point whenever you are in any pain. Do this on both the right and left hand.
Step 5: The Arm and Elbow Reflex
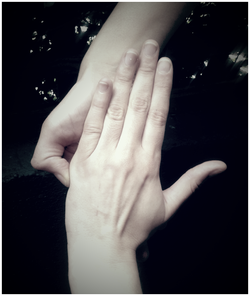
This reflex can be found at the top outer ridge of the hand just by the knuckle as is demonstrated in the diagram. Apply pressure to this first point and make your way down the ridge of the hand. Around three shuffles should suffice, remember to add pressure, make circular motions and spend extra time on any spots which are painful, gritty or bubbly. Do this on both the right and left hand.
I hope that was helpful and stay tuned for more DIY reflexology.
Love, love, love x
Love, love, love x
 RSS Feed